Eco Brooklyn is a solar hot water installer. We do a great job at installing solar hot water systems on NY brownstones. But the greatest issue with the installation of renewable energy systems in homes and businesses is the large initial investment.
On builditsolar.com they have developed a low cost alternative to conventional store-bought solar water heating systems that costs around $1000.
The steps are simple, the execution is likely not, but the do-it-yourself mentality that is being proposed by this site is necessary for green building methods to be readily available to low and middle class populations. If this design proves to be as efficient and inexpensive as it appears, it could be a major step to reducing green house gas emissions.
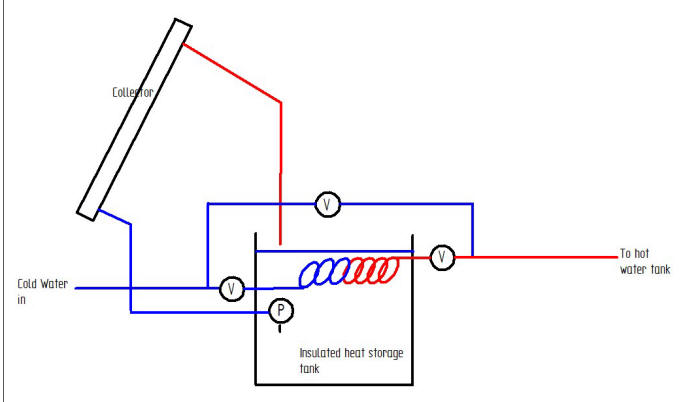
Fig. 1: Basic Solar Water Heater Design. Courtesy of builditsolar.com
Figure 1 visually explains the basic set up. The key steps to building this system are:
1.Understanding the System Philosophy
2.Building the Collector
3.Building the Insulated Heat Storage Tank and Heat Exchanger
4.Plumbing
1. The Philosophy
Energy is taken from the sun and used to supplement a previously installed hot water heater. If water comes into the hot water heater at the working temperature, then the heater will not use any new energy to further heat the water. This happens when the sun comes in contact with the collector and heats the piping that cold water is traveling through. This water is isolated in the system and will never be used in the home, but will stay in the collector and storage tank system.
In the storage tank a looped tube will carry city water used in the home through the heated water from the collector allowing the energy collected from the sun to be transferred to potable water in the home. It is important that the collector is built above the heat storage tank to allow for the water to flow back down when the pump is turned off, and for the collector to be positioned south-facing (if you are in the northern hemisphere) with an ideal tilt angle equal to your latitude.
2. Building the Collector

Fig 2: A collector with serpentine copper tubing
There are two low cost options for building the collector, and they both involve building a plywood support with serpentine tubing attached to it with water flowing through this tubing. The water is heated by aluminum fins that are installed over the tubing and painted black. The option is between what type of tubing will be used. Copper tubing is the expensive option, but has approximately 15% better results than the PEX tubing option. To make up for this efficiency difference one can choose to size up the system. This price difference changes drastically based on the current copper prices.
3. Building the Insulated Heat Storage Tank and Heat Exchanger
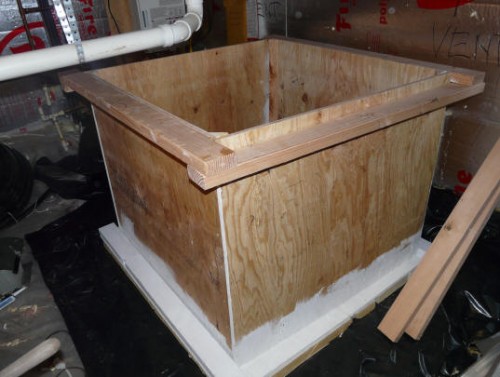
Fig. 3: Heat storage tank under construction
The storage tank is built with a combination of plywood and 2x4s with a PDX (rubber) liner to prevent leakage. This system is then insulated with polyisocyanurate. Dimensions of the design can change, but it must be carefully constructed, as it will be carrying approximately 150-200 gallons of hot water. The heat exchanger is simply a coil of PEX plastic pipe. This is where the city water will gain energy before it is sent to the hot water heater.
A practical length of tubing is 300ft x 1in diameter and will carry about 9 gallons of water. This means that, given enough time, there will be 9 gallons of hot water that will be at the temperature of the heat storage tank water between uses. The water that follows will warm steadily and the output temperature will be based on the flow rate during use. Basically, this is extremely efficient if enough time is given between uses and less water than the heat exchanger can hold is used.
4. Plumbing
There is a pump that is submerged in the storage tank and left at the bottom (this is where the water in the storage container is coldest). The pump runs water up a tube connected to the PEX or copper tubing at the bottom of the collector. From the top of the collector a tube brings the hot water back to the heat storage tank. The beauty of this design is that when the pump shuts off the water flows back into the storage container and will not freeze in the collector if it is being exposed to winter temperatures. The city water is simply run through the heat storage tank to the hot water heater with a connection before the heater to allow cold water to also be used in the house.
Conclusion:
With the use of do-it-yourself designs like this one from builditsolar.com green energy is becoming available to more people everyday. If designs like this become trusted, and the impacts are seen and understood by the public, global warming can be mitigated while increasing the standard of living for families that financially struggle to heat their water.